Articles on the help category on this website may be outdated. Please visit Our new help center to read the latest content.
Advanced Foodics and Wafeq Integrating with Branches Support
.png%3Falt%3Dmedia&w=1920&q=75)
This guide offers a detailed walkthrough for integrating Foodics, a comprehensive restaurant point of sale (POS) system, with Wafeq, an advanced accounting and e-invoicing solution. By connecting these two platforms, users can automate data synchronization, including sales, inventory, and payments, to streamline restaurant operations and financial management.
How to integrate Foodics with Wafeq
Getting Started with Integration
Accessing Integrations
- Log into your Wafeq account and navigate to the Side Menu.
- Locate and click on the
Integrationsoption. This opens a page listing all the integrations available with Wafeq.
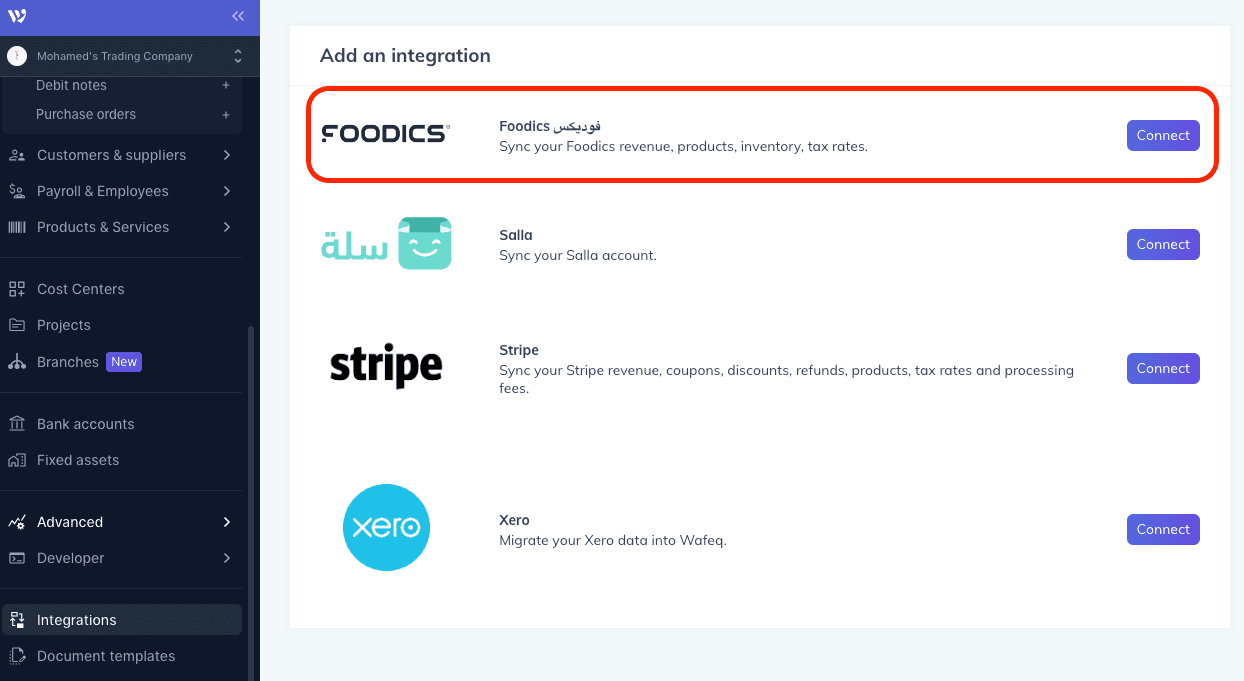
Connecting to Foodics
- In the integrations list, find
Foodicsand click on the 'Connect' button.
- A new window prompts you to enter details of your Foodics company account.
Ensure you have owner-level access to the Foodics account for successful integration.
Ensure you have owner-level access to the Foodics account for successful integration.
What is Foodics
1- Overview of Foodics
Get 30% Off Wafeq yearly packages
Enter your email to receive your exclusive discount code. New users only!
Foodics is a versatile POS system designed for restaurants. It manages customer orders, tracks sales, and provides real-time data on restaurant operations.
2- Exploring Order Management in Foodics
- Inside Foodics, orders are recorded with comprehensive details such as order numbers, associated branches, order statuses (active, pending, completed), sources (e.g., dine-in, takeaway), total amounts, and timestamps.
- Detailed insights into each order include subtotals, applicable taxes, and itemized products.
- Payment methods used for each order are also recorded, providing a clear picture of transaction modes.
3- Using the Inventory Module
The inventory module in Foodics is crucial for managing stock levels, tracking item consumption, and maintaining accurate records of available inventory.
Although not all users utilize this module, it’s especially useful for restaurants with extensive inventory needs.
4- Managing Suppliers and Purchasing
- Foodics allows you to manage supplier relationships, track supplier invoices, and handle purchasing.
- Create and manage purchase orders directly in Foodics, mirroring similar processes in Wafeq.
Read more: Unlocking Business Efficiency with Foodics.
Integration Details - Step by Step
Configuring Integration Settings
After connecting Foodics to Wafeq, you need to configure the integration settings for proper data alignment.
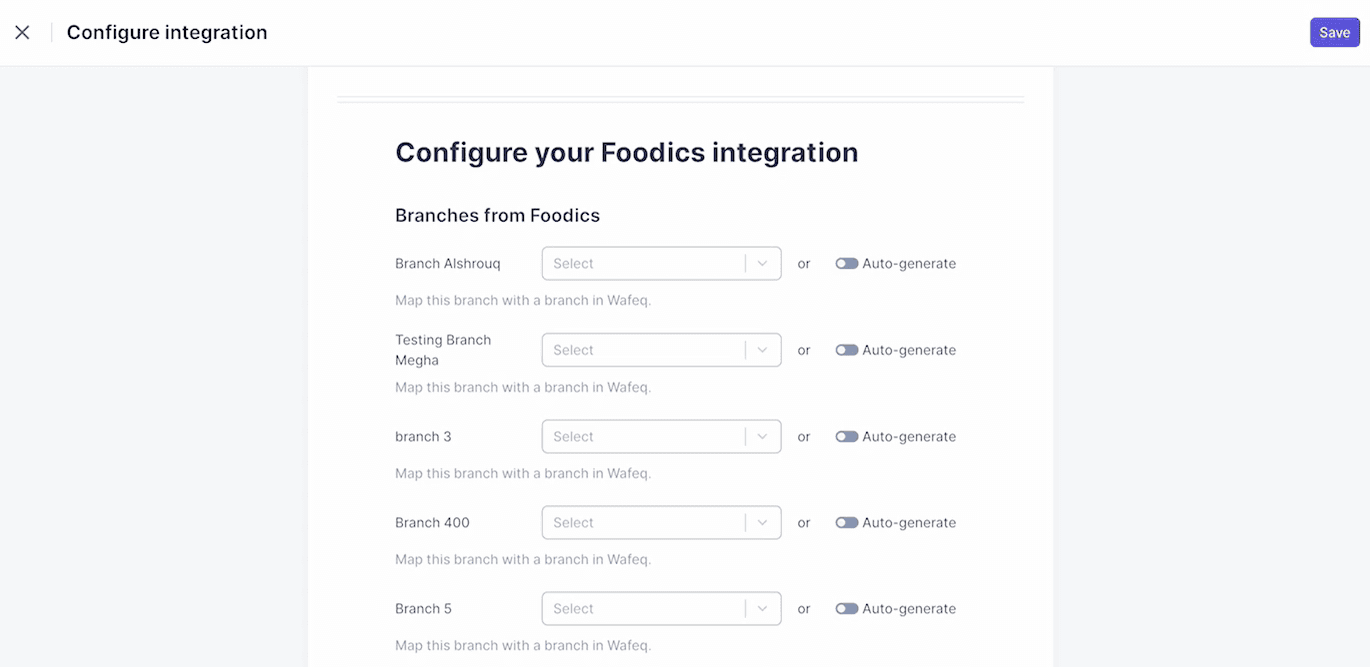
Step 1: Map Branches
Click on Configure in your Wafeq account in the Foodics integration section.
To map branches, you have two options:
Manually Map Branches: Select each branch in Foodics and match it with the corresponding branch in Wafeq.
Auto-Generate Branches: If you have not set up branches in Wafeq, use the Auto-Generate option. This will create and map branches in Wafeq based on your Foodics data.
Step 2: Map Tax Rates
- Next, align the tax rates from Foodics with those in Wafeq.
- If a required tax rate is not available in Wafeq, follow these sub-steps:
- Navigate to
Taxes Ratesin Wafeq. - Click on
Create a Tax Rate. - Enter the tax rate details as they appear in Foodics.
- Save the new tax rate.
- Return to the integration configuration page and select the newly created tax rate from the dropdown menu for the corresponding Foodics tax rate.
Step 3: Map Payment Methods
- In the integration settings, map the payment methods used in Foodics to the relevant accounts in Wafeq.
- For cash-like payment methods, associate them with a bank or cash account in Wafeq.
Other Payment Methods
- For non-cash payment methods (like gift cards), map them to the appropriate liability accounts.
- Use the
Auto-Generatefeature if needed to create new accounts in Wafeq for unmatched payment methods.
Step 4: Sales from Foodics
Decide which account in Wafeq will record sales from Foodics.
It's recommended to create a new account in Wafeq specifically for Foodics sales, such as Sales from Foodics, for easy identification and tracking.
Step 5: Configure Refund Settings
- Choose the Wafeq account where refunds processed in Foodics will be recorded.
- You might want to set up a dedicated account for refunds to keep track of these transactions separately.
Step 6: Configure Charges and Rounding
Charges from Foodics: Select an account in Wafeq where charges from Foodics (like delivery fees) will be booked.
This helps in segregating operational expenses from regular sales.
Rounding: Determine the account in Wafeq to record rounding differences that occur in Foodics.
Rounding differences are minor but necessary for accurate accounting.

Step 7: Configure Inventory Tracking
- Determine how to track inventory value changes in Wafeq as a result of Foodics transactions.
Note that Wafeq does not use its inventory system for detailed item tracking or quantities from Foodics.
Note that Wafeq does not use its inventory system for detailed item tracking or quantities from Foodics.
- The integration focuses on updating the total inventory value based on overall value changes from Foodics.
- For detailed item-wise inventory data, refer to Foodics as the primary source.
Step 8: Configure Tips, Discounts and coupons
- Choose appropriate Wafeq accounts to record tips, applying them to liability accounts.
- Select accounts for discounts and coupons offered to customers, aiding in promotional expense tracking.
Performing Data Synchronization
Once the mapping is complete, the next step is to sync data from Foodics to Wafeq.
Step 1: Initiate Sync
- Sync page will open in Wafeq.
- Select a date range for the data you wish to sync.
Note that you can only sync completed days (up to yesterday).
Note that you can only sync completed days (up to yesterday).
- Choose the types of data to sync. Options include sales, inventory transactions, order transactions, and more.
- You can also enable
Auto Syncfor daily automatic synchronization of data.
- Click
Syncto start the synchronization process.
A progress log will appear, showing the status of the sync. You can leave this page and return later; the sync will continue in the background.
A progress log will appear, showing the status of the sync. You can leave this page and return later; the sync will continue in the background.
- Once the sync is complete, all selected data will be updated in your Wafeq account.
Resyncing Data
In case of configuration errors, delete and resync the desired data.
For invoice resynchronization, remove all associated payments before deletion.
For invoice resynchronization, remove all associated payments before deletion.
Integrating Foodics with Wafeq offers an efficient solution for managing restaurant operations and finances. This guide aims to facilitate a smooth integration process. For any further assistance or inquiries, our support team is readily available to provide help and ensure your integration experience is seamless.
Ready to transform your restaurant's financial management? Explore the power of Foodics and Wafeq integration today!
Ready to transform your restaurant's financial management? Explore the power of Foodics and Wafeq integration today!


![New Product Features [March-2023]](/_next/image?url=https%3A%2F%2Ffirebasestorage.googleapis.com%2Fv0%2Fb%2Fwafeq-docs.appspot.com%2Fo%2Fmedias%252Fd68397dc_Help%20Center%20-%20EN%20Article%20Cover-22.png%3Falt%3Dmedia&w=3840&q=75)


.png%3Falt%3Dmedia&w=3840&q=75)


