Articles on the help category on this website may be outdated. Please visit Our new help center to read the latest content.
Creating a recurring or scheduled invoice
Recurring invoices are not much different from regular sales invoices. The key distinction is that they are automatically repeated on specific dates, without the need to create them manually each time. They are ideal for many use cases such as subscriptions, long-term contracts, or any service delivered on a regular and consistent basis. This saves valuable time and reduces the risk of manual errors.
In this guide, we’ll walk you through how to create and manage recurring invoices step by step.
How to create a new Recurring Invoice
Click on Sales from the main menu, then select Recurring Invoices, and click the Create button.
Enter the invoice details as the same used in regular sales invoices, then click Save.
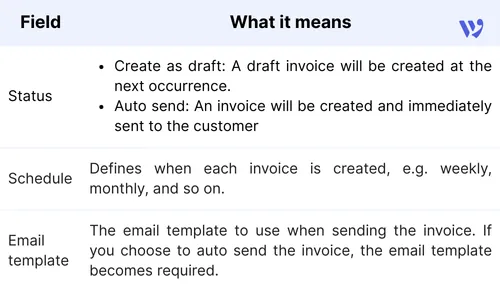
In addition to the usual required fields when you create an invoice, recurring invoices have the following fields:
For more details on invoice items and how to add them, refer to [this guide].
After saving the invoice or by navigating to the Recurring Invoices list, you can set the recurrence schedule by clicking the Schedule field for the invoice you want to configure.
A pop-up will appear with the following fields:
- Start on: Choose the date when the first recurring invoice should be created.
- Repeat every: Define how often the invoice should be created, such as monthly or every two weeks.
- At time: Specify the time of day you want the invoices to be created.
Make sure to check the time zone displayed next to the time field (e.g., Africa/Cairo GMT+3), as all scheduled times follow this setting.
Make sure to check the time zone displayed next to the time field (e.g., Africa/Cairo GMT+3), as all scheduled times follow this setting.
Note that this time zone may differ from that of some of your customers.
If you want the first recurring invoice to be created on the same day you create it, and you’ve selected today’s date in the “Start on” field, make sure to choose a time later than the current time in the “At time” field. Example: If you create the invoice at 10:30 AM and set today as the start date, the time should be 11:00 AM or any time later. However, if you select 10:00 AM, the first invoice will not be issued today. Instead, the system will wait until the next occurrence based on the recurring interval.
If you want the first recurring invoice to be created on the same day you create it, and you’ve selected today’s date in the “Start on” field, make sure to choose a time later than the current time in the “At time” field. Example: If you create the invoice at 10:30 AM and set today as the start date, the time should be 11:00 AM or any time later. However, if you select 10:00 AM, the first invoice will not be issued today. Instead, the system will wait until the next occurrence based on the recurring interval.
- Due Date: Select the invoice’s due date; this is the date by which the invoice should be paid.
- Ends: Choose
Neverif you want the invoice to repeat indefinitely, or selectAfterand enter the number of occurrences if you want the invoice to stop after a specific number of times.
After setting these fields, press the Save button.
Email Template
An email with the generated invoice is automatically sent to the customer with each recurrence. You can configure which email template to use via the Email Template field.
Click on the Email Template field, then select a template from the dropdown menu, or click Add Email Template If you’d like to create a new one and use it.
If you choose to add a new template, enter a name for the template and a subject line (this will appear as the email title to the customer), then write the email message as desired and click Save.
- By clicking
Insert PlaceholdersYou can personalize the email experience by inserting dynamic fields such as the company name or invoice number.
You won’t be able to activate or send the recurring invoice until an email template is selected.
You won’t be able to activate or send the recurring invoice until an email template is selected.
If you'd like to preview how the email will look before it's sent to the customer, select the recurring invoice by ticking the box next to it, then click the Send test email button.
- Status: This field indicates the status of invoices generated from the recurring invoice. Select
DraftIf you want the generated invoices to be created as drafts, orSentif you want them to be automatically marked as sent upon creation. - Is active: From the dropdown menu, select
Yesto activate the recurring invoice and begin generating invoices accordingly. SelectNoto pause or delay activation.
Viewing and Editing a Scheduled Invoice
If you want to review one of your scheduled invoices or update its details, simply click the Click for form view icon next to the invoice. This will allow you to view the full invoice and make any necessary edits. Once you're done, click Save to apply the changes.
Recurring Invoices List
You can access your list of scheduled invoices by clicking on Sales from the main menu, then selecting Recurring Invoices.
From here, you’ll find several actions you can take:
- Search Bar Use this to find a specific scheduled invoice by typing the client’s name or part of it.
- Action Buttons
- Sort: Click to organize the list based on certain parameters, such as creation date or last updated.
- Filter: Click to narrow down results by specific criteria like status or item.
- Import: Click the import button if you want to upload multiple recurring invoices at once from an external file.
- Export: Click the export button to download and save a copy of your recurring invoices list from Wafeq to your local device.


![New Product Features [March-2023]](https://firebasestorage.googleapis.com/v0/b/wafeq-docs.appspot.com/o/medias%2Fd68397dc_Help Center - EN Article Cover-22.png?alt=media)


.png?alt=media)