Articles on the help category on this website may be outdated. Please visit Our new help center to read the latest content.
Recording a supplier advance

Effectively managing advance payments to suppliers is a key aspect of financial management, ensuring that your accounts are accurate and up-to-date. This guide provides a step-by-step approach for recording advance payments to suppliers in Wafeq, from the initial payment setup to applying these payments to future supplier bills.
Expanding on this, we also cover the intricacies of including tax considerations and managing bank fees associated with these transactions. Following these detailed instructions can streamline your payment processes, maintain accurate financial records, and ensure compliance with tax regulations.
When you want to make an advance payment to the supplier before they dispatch the goods or provide the service, you can create an advance payment to the supplier.
Note: When you create a supplier advance, Wafeq will automatically create a debit note for the supplier which you will be able to apply to future supplier bills
Note: When you create a supplier advance, Wafeq will automatically create a debit note for the supplier which you will be able to apply to future supplier bills
Get 30% Off Wafeq yearly packages
Enter your email to receive your exclusive discount code. New users only!
Step-by-step instructions
- On the left side menu, go to Supplier Payments.
- Click on Create payment, then choose Bills payment/advance.
- Select your Supplier in the dropdown.
- In the Paid Through dropdown, select the bank account where you made the payment. The payment currency will automatically be selected as the bank account's currency.
- In the Amount paid, enter the amount you pay from your supplier in your bank account.
- In Payment type, select Advance payment.
- Click Save.
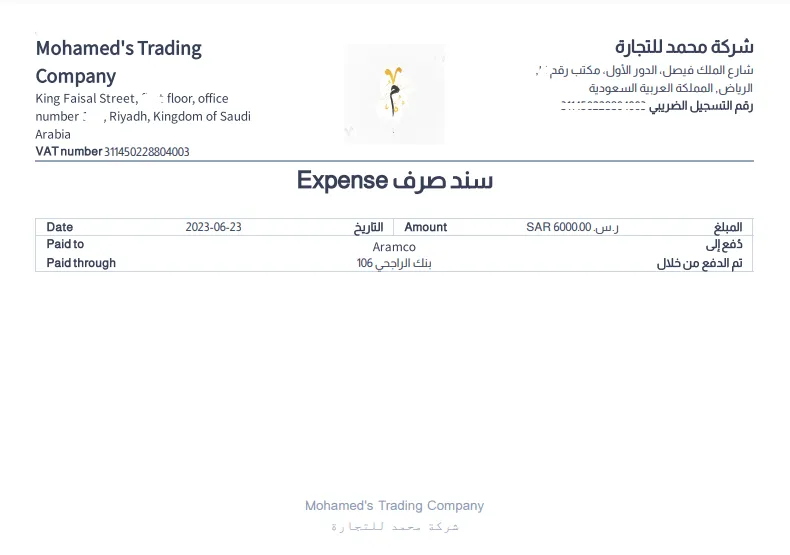
Here's an example of a Supplier advance:
Applying the advance to a supplier bills
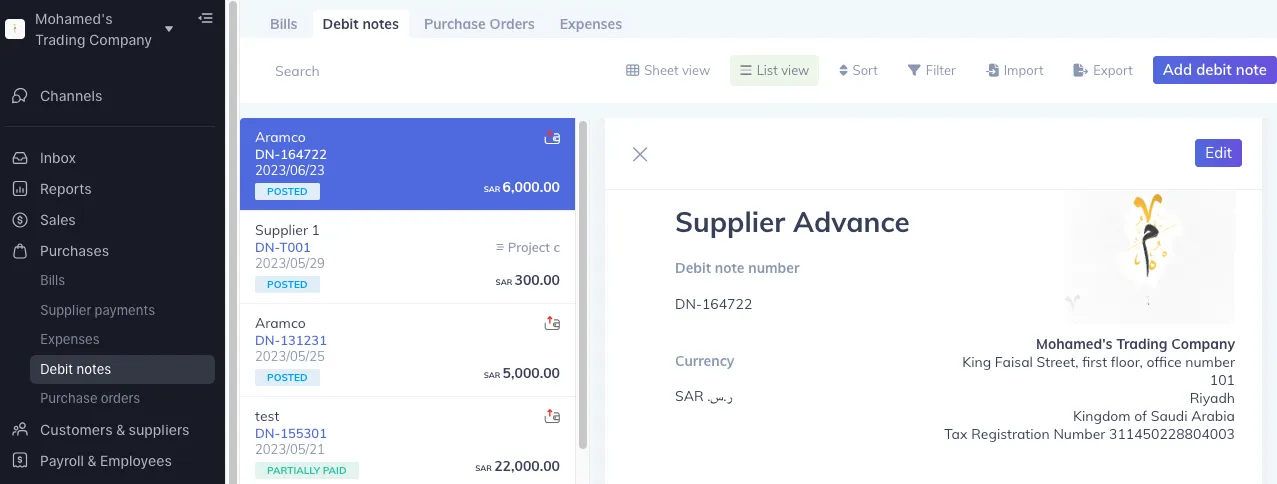
When you create a supplier advance payment, Wafeq will automatically create a Debit Note for the supplier. You can find the Debit note by going to Debit Notes in the left-side menu.
You can then apply the debit note discount to a bill.
Debiting the supplier in a specific currency You can only apply debit notes to bills that have the same currency as the debit note. When creating the payment advance, you can change the amount to debit currency so that you can apply the debit note to a bill of the same currency.
Debiting the supplier in a specific currency You can only apply debit notes to bills that have the same currency as the debit note. When creating the payment advance, you can change the amount to debit currency so that you can apply the debit note to a bill of the same currency.
Here's an example of a debit note created from supplier bills:
How to Record an Advance Payment to a Supplier with Tax
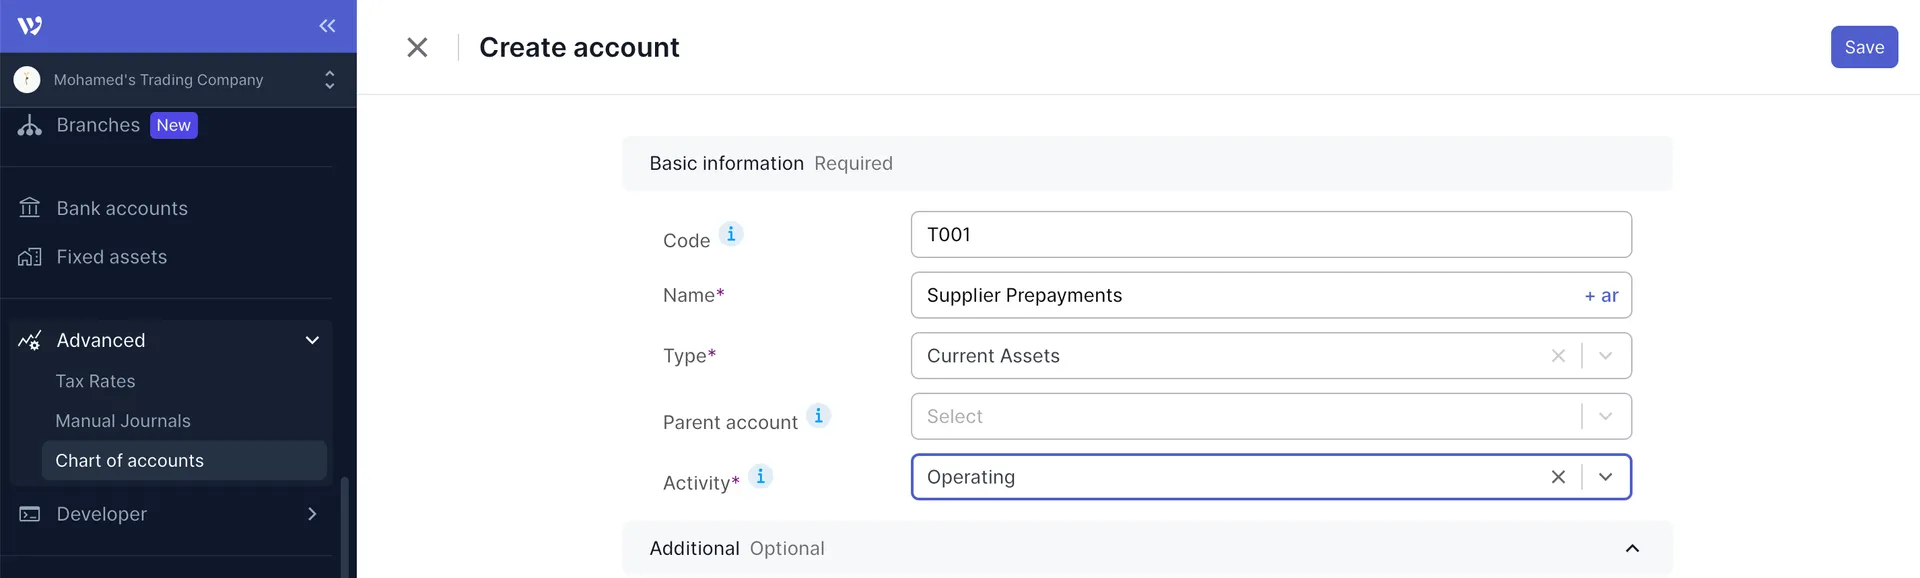
Step 1: Set Up a Supplier Prepayments Account
First, create a "current assets" account named `Supplier Prepayments` to track the prepayment. This helps in monitoring advance payments distinctly from other financial activities.
Step 2: Record the Advance Payment
- Navigate to the cash expense option in the side menu.
- Enter the prepayment amount in the `Amount` field.
- Select the `Supplier Prepayments` account.
- Choose the bank account you're paying from in the `Paid Through` field.
- Apply the appropriate tax rate, deciding between inclusive or exclusive tax models.
Note:
Note:
It's important to remember your choice of tax model, as this will be crucial when generating the final bill.
Step 3: Generate the Final Bill
When creating the final bill:
- List all purchased items as usual.
- Add a line item named `Prepayment / Advance Payment on Bill No. [reference]` with a negative amount to reflect the advance payment.
- Input the tax amount from the advance payment and assign it to the `Supplier Prepayments` account.
Ensure the tax model matches the initial cash expense for consistency.
Handling Bank Fees
- If bank fees are included with the advance payment on your statement, adjust during bank reconciliation by booking the difference to a `Bank Fees` account.
- For separate bank fees, record them through a manual journal entry or directly on the bank transactions page, allocating them to the `Bank Fees` account.


![New Product Features [March-2023]](https://firebasestorage.googleapis.com/v0/b/wafeq-docs.appspot.com/o/medias%2Fd68397dc_Help Center - EN Article Cover-22.png?alt=media)


.png?alt=media)